a glob of nerdishness

October 20, 2011

Creating a self-signed S/MIME certificate for Mac and iOS 5 email

written by natevw @ 12:43 pm

Today I needed to send some passwords to someone over the internet again. The recipient recommended using PGP/GPG to send an encrypted email, but unfortunately that protocol appears to be quite a hacky hassle if you use the built-in email clients on Apple’s (and apparently Microsoft’s) platforms.

Fortunately, iOS 5 just added support for a more standard protocol called S/MIME, and so I had recently come across a nice article on setting up secure email on both Mac OS X and iOS 5. Since I mostly want S/MIME for email encryption rather than signing (there’s a good overview of the distinction on its Wikipedia article) I decided to just create a self-signed pair rather than procuring a certificate from some annoying, overpaid and insecure centralized certificate “authority” as that article recommends.

Creating a self-signed S/MIME certificate is actually very quick and relatively easy using the Keychain app that comes with Mac OS X, but I wanted to document the process as getting a certificate that Mail recognizes did require overriding at least one of the assistant’s defaults:

Update: Turns out Mozilla Thunderbird will not accept the certificates generated through this process. I’ve had success by creating a standalone personal certificate authority and then using that to sign a user-only certificate. I need to test it a bit more before writing it up here, but it might be a bit simpler process in the end.

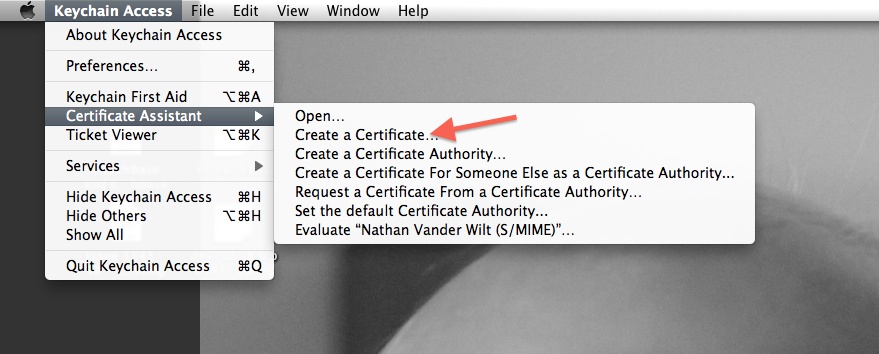
  1. In the Keychain utility application’s menu, choose “Create a Certificate…”:
    Self-signed S/MIME certificate creation, figure 1
  2. I had to override the defaults primarily so I could include my email address necessary for Mail.app to use it:
    Self-signed S/MIME certificate creation, figure 2
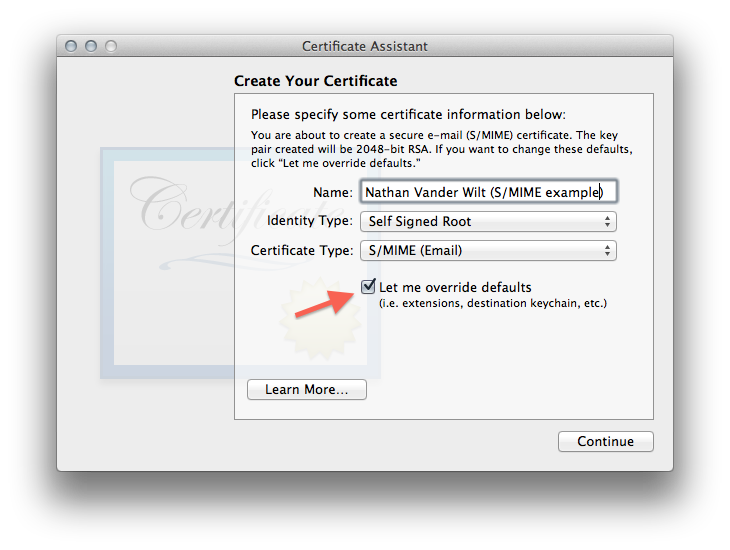
  3. Confirm that self-signed is okay
  4. I just accepted the default serial number (1) and validity period (365 days)
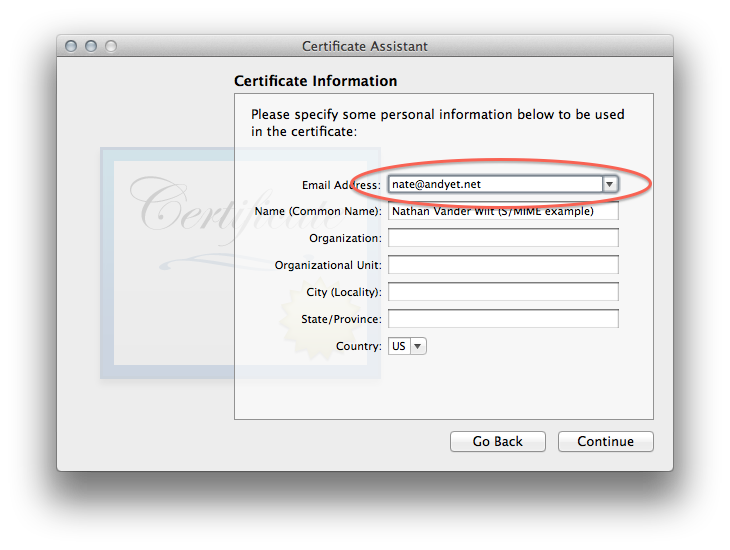
  5. Then the part where you enter (at least) the email address you want to use this certificate with:
    Self-signed S/MIME certificate creation, figure 3
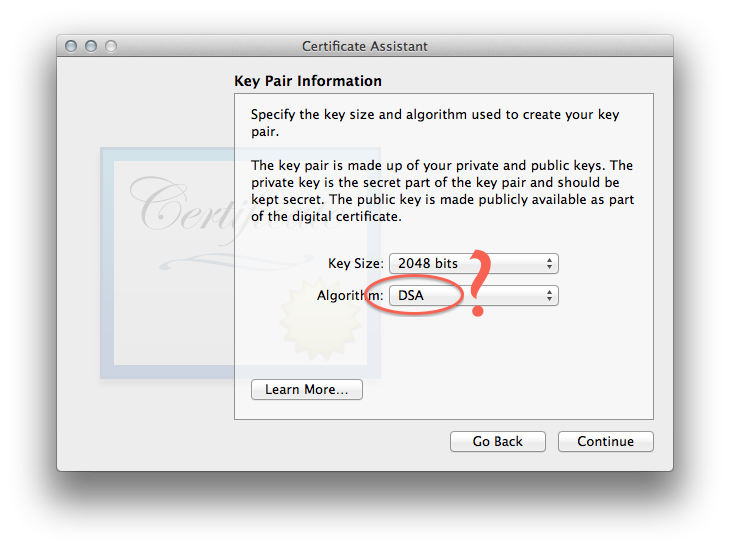
  6. For the actual keypair, I went with DSA mostly just because:
    Self-signed S/MIME certificate creation, figure 4
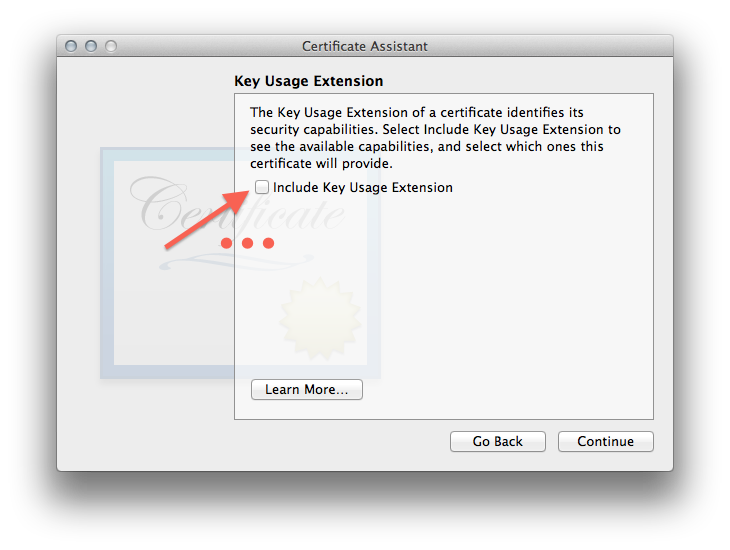
  7. I unchecked all the certificate metadata stuff in the next 4 steps, you can try playing with it but didn’t seem worth the complication:
    Self-signed S/MIME certificate creation, figure 5
  8. Then just have the assistant create it in your login keychain unless you have some different setup. It will take a bit to generate the keypair.
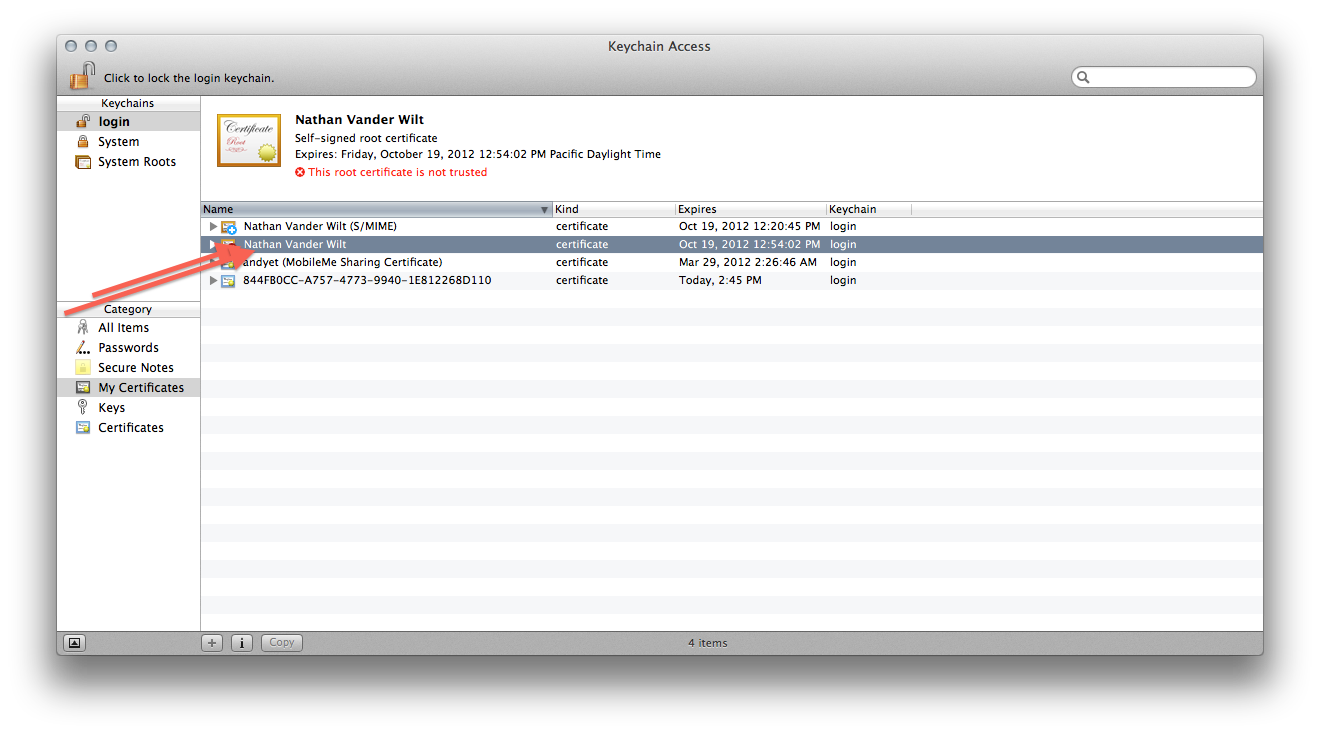
  9. Once it’s created you’ll need to find the certificate and double click it…
    Self-signed S/MIME certificate creation, figure 6
  10. …so that you can manually trust it for at least S/MIME:
    Self-signed S/MIME certificate creation, figure 7

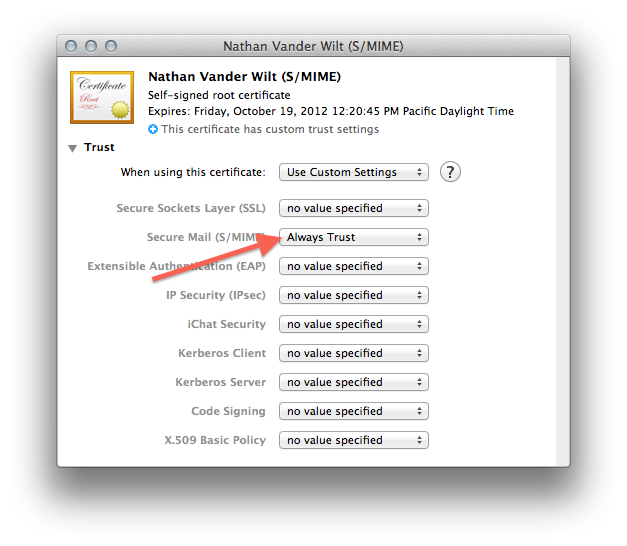
Once you’ve done that, you’ve taken care of the “The Certificate” step and can just follow the rest of the instructions in Ars Technica’s “How to secure your e-mail under Mac OS X and iOS 5 with S/MIME” article using the certificate you created instead of one from some corporation.

There is one major drawback to a self-signed (decentralized) certificate. As you’ve seen yourself after creating your certificate, it will not be trusted by default — only several dozen corporations and governments and rogue nations are trusted to forge certificates; you are not on any platform’s pre-approved issuer list. So: after you give your public key to your email contacts (as will be necessary for them to decrypt your messages) they will have to repeat steps 9 and 10 above to manually trust your self-signed certificate on their own machine.

May 21, 2008

Resuming incomplete downloads

written by natevw @ 11:52 am

Here’s a quick little tip I had to figure out again today. Sometimes a flaky network or server will cause Safari to think it is done downloading a file before it’s complete. When this happens, Safari will drop the incomplete file out of its temporary download wrapper, leaving you stuck with a partially saved copy that can no longer be resumed. If this happens halfway through a large file, you can use the built-in OS X ‘curl’ command to resume the incomplete download right where it quit, provided the server supports it:

curl -o <incomplete_local_file> -C - <URL>

The trick is the ‘-C’ option with the “-” argument, which tells curl to continue from the offset automatically determined by the local partially-downloaded file.

April 25, 2008

Debugging Universal applications in Rosetta

written by natevw @ 11:02 am

Apple have a guide on debugging PowerPC binaries on an Intel-based Macintosh. Unfortunately, those instructions do not work if the application is a Universal Binary.

If Xcode’s build settings dialog hadn’t gone from kinda bad to utterly screwy, it might have been easiest just to temporarily edit your application target’s build settings to build just ppc. As an alternative, you can use the following steps to debug the PPC code of a Universal binary on an Intel Mac:

  1. First, make sure your Debug version of your application’s target is set to include the ppc architecture. It may be set to just the “Native Architecture” to speed up normal debug builds.
  2. You will need the OAH_GDB environment variable set. In bash, use: export OAH_GDB=YES.
  3. Instead of running your application directly as Apple’s reference states, use /usr/libexec/oah/translate /<path>/<your_application>.app/Contents/MacOS/<your_application> from the shell in which you set the OAH_GDB flag.
  4. Open another terminal tab and start gdb using gdb --oah.
  5. Instead of attaching to <your_application>, you will need to attach to the “translate” process that’s running your app. GDB may autocomplete the whole thing if you press Tab after typing just “attach “.
  6. Now use gdb’s c command to Continue (or start, in this case) execution. Prepare for extremely slow execution, since your app is running under both Rosetta and the debugger.

Note that only the odd numbered steps, especially steps 3 and 5, differ from Apple’s instructions. Since it’s a Universal Binary, you have to force PPC behaviour by manually starting your application in the Rosetta translator.

Whichever method (compiling ppc-only or running via translate) you like better, you will likely want to load your app’s symbols with the gdb command symbol-file /<path>/<your_application>.app/Contents/MacOS/<your_application>. If you’re like me and generally inept with raw gdb, you may find the tips and links Apple’s Using GDB for Testing article to be a good starting guide for learning your way around gdb. There are some caveats to debugging under Rosetta mentioned in the first Apple guide, especially that you can’t call functions. Of course, I didn’t realize that was even possible, so I guess I’ll have to try that when I’m debugging normally sometime!

March 22, 2008

Federal 1040 helper as Numbers spreadsheet

written by natevw @ 12:41 pm

Below you will find the IRS’s Federal 1040 form in a completely unofficial, completely at your own risk spreadsheet template worksheet for iWork’s Numbers application. As you fill in each line, it updates an estimate that might be similar to what you might owe or be refunded from federal United States taxes. This year, only the main F1040 form is “complete” although there is a very simplified part of Schedule C that hooks in as well.

f1040 spreadsheet screenshot (reduced)

You can download the template and try it out. It is licensed under a Creative Commons Attribution, Share Alike license so feel free to share any corrections or additions.

As I’ve posted before, I quit my job at the end of last year. In preparation, my wife and I were trying to estimate where we might be at financially this year. I love Numbers, so I put this together to help get a more solid estimate of our tax liability. While I was preparing this year, it also helped me see by how much deductions would affect the bottom line. Of course, this is no substitute for the official forms or the advice of a certified accountant. Don’t trust this form, but please do let us know if you find any errors. Either leave a comment for everyone, or if you want to send attachments my email account with yahoo.com is “natevw”.

Speaking of the official forms, another piece of advice: On both of my work computers, Preview.app has two frustrating, er…deficiencies I’ve encountered when filling out the PDF tax forms. First of all, if I use “Save as” to keep my work it instead *clears* my work and I end up with two blank PDFs. I think a hearty EPIC FAIL is in order here. When I try to work around that by printing to a PDF instead, it often crashes halfway through printing and I end up with one blank and one corrupted PDF. So the advice? Do all your official figuring on good old paper printouts and pencil. If you do want it in digital form, copy the values into the spiteful electronic nemesis when you’re all done. Then if (WHEN!) it tries to subvert you, you needn’t waste time recalculating.

December 3, 2007

Hacking Stacks: A Failed Attempt

written by natevw @ 10:18 am

I’m pretty much enamored with optica-optima’s DRAWERS icons for Stacks. The concept, the icons, even the disk image they come in. Imagine my horror when my first subsequent download plopped itself right on top of my wonderful new “drawer”, once again shattering the illusion that I could like Stacks. “Date Added” is not a ‘touchable’ file property — the Dock somehow keeps track of this itself. Googling revealed a folder action based fix, but I wanted something that could be done automatically for all Stacks present and future. Poking and prodding revealed that I could sqlite3 ~/Library/Preferences/com.apple.dock.db and look at the fairly simple database the Dock uses for Stacks.

There’s a “directories” and a “files” table. The directories table has one row per stack, and just one main “path” column (it also has an sqlite3-implicit ROWID used as the directory_id elsewhere. The rest of each stack’s info is in the Dock’s plist). The files table had what I was looking for: an “ordering” column. So I added a drawers table, and inserted rows for each beautiful icon:

CREATE TABLE IF NOT EXISTS drawers (directory_id INTEGER, filesystemid INTEGER);

INSERT INTO drawers (directory_id, filesystemid) SELECT directory_id, filesystemid FROM files WHERE name LIKE ' %'; -- this should be a trigger for future additions, but see results....

Then I added a trigger so that whenever a new file is added to a stack with a drawer icon, the drawer’s icon would still have the highest “ordering” value:

CREATE TRIGGER drawer_defender AFTER INSERT ON files
BEGIN
 UPDATE files SET ordering=NEW.ordering+1 WHERE directory_id = NEW.directory_id AND filesystemid IN (SELECT filesystemid FROM drawers WHERE directory_id  = NEW.directory_id);
END;
-- if BEFORE INSERT, the new row doesn't show up at all for some reason

CREATE TRIGGER drawer_cleanup ON files AFTER DELETE ON files
BEGIN
 DELETE FROM drawers WHERE drawers.filesystemid = OLD.filesystemid AND drawers.directory_id = OLD.directory_id;
END;

The bad news is that while this works as far as the database is concerned, the Dock seems to keep track of the ordering itself until you “killall Dock”, which puts us right back in folder action territory with an even uglier transition. So unless somebody finds a way to get the Dock to read in the database without getting killed first, or Apple’s usability team regains a say in what prominent features get shipped, it looks looks like the sleight-of-hand folder action is still the best bet for helping Stacks out. That method has the added advantage of not requiring users to tinker with private Dock internals as well, which is probably a good thing.

November 16, 2007

Google IMAP in Mail.app (latecomer version)

written by natevw @ 4:31 pm

[Editors note: I'd been editing this article for a few days, and then John Gruber sent everybody to a similar article on 5thirtyone instead. I'm not jealous or anything — this glob is too typographically atrocious to merit a link from DF at present — but I still wanted to put this up for my own reference.]


Google recently rolled out free IMAP support to Gmail users. This is a neat gesture, but they twisted the IMAP protocol so that it works in The Way of the One True Algorithm. In their own words, “we’d like to make your IMAP experience match the Gmail web interface as much as possible”. Fortunately, Apple’s Mail provides the tools necessary to work around most of this Google IMAP “experience”.

The skinny

  1. Set Mail.app to work with Gmail
  2. Google has recommended settings. Ignore them. Well, DO uncheck “Store sent messages on the server”, unless you are using a non-Google SMTP server. But don’t uncheck “Store deleted messages on the server” or “Store junk messages on the server”.
  3. Map Gmail IMAP Folders to Mail.app Default Folders:
    Use mailbox For Mail’s…
    [GMAIL]/Trash Trash
    [GMAIL]/Spam Junk
    [GMAIL]/Drafts Drafts
    [GMAIL]/Sent Mail Sent, only if you are using a non-Gmail SMTP server
  4. Google has a table showing what actions in your email client do to your Gmail. Read them, but realize half of them are wrong or irrelevant with the way Mail.app is now set up. Here’s some corrections:
    If you want Gmail to… Do this in mail
    Apply a star to a message. Flag the message.
    Apply a label to a message. Copy the message to the corresponding folder.
    Remove a label from a message. Move the message to “[GMAIL]/All Mail”. Don’t delete the message.
    Undelete a message. Move it to “[GMAIL]/All Mail” or another label.
    Make “All Mail” not match what Mail.app shows Delete a message from “[GMAIL]/All Mail”. Don’t do this!
  5. As you use it, sometimes things get out-of-sync for a bit since Gmail is changing folder contents behind the scenes in ways that Mail.app doesn’t expect. If you want to make sure that what you see in Mail reflects the way things are in Gmail right away, use the “Synchronize All Accounts” item in the “Mailbox” menu.

The key to understanding how Google changed IMAP is to realize that the folders it presents are never locations in the sense that folders usually are, which is the sense that Mail.app treats them. Every Gmail IMAP folder is just a “Label”, a tag. Because of this, you may find (or place) copies of the same message in multiple folders. To Mail.app, these each look like individual messages with an identity of their own. To Gmail, they are just differing representations of one underlying object, which can only be deleted via the Trash.

The gory details

So what’s the problem with just doing it the way Google says to? Having folders represent labels means that Mail.app’s “Delete” button won’t work like it does for with normal IMAP accounts. When you “delete” a message in Mail, it removes it from whatever folder it was in and puts it in a deleted items folder. Since it doesn’t know about Gmail’s Trash folder, it creates a new one named “Deleted Messages” and moves your deleted items there. This is a problem, because to Gmail you’re just removing the “Inbox” tag and adding a tag called “Deleted Messages”. You haven’t really deleted the item, and it will still show up in “[GMAIL]/All Mail” and any other Label folders it was in. Then when you empty Mail’s trash, Gmail just sees you removing the “Deleted Messages” label and the message lives on, even if orphaned.

Deleting

To actually delete the underlying message, you must place a representation of it into the “[GMAIL]/Trash” folder-aka-label. (That’s what the mapping in step 3 is about.) While it hangs out there, the message will be hidden from all the other label folders it was in. If you move it back to another “folder”, it will reappear in all the Labels it previously had. There is one catch, though.

Not deleting, when we don’t mean to

What if we want to keep our message, but just remove a particular Label? If we hadn’t told Mail to use the “[GMAIL]/Trash” folder for storing deleted messages, we could just delete a message from the corresponding folder to clear that label. But if we do that now, Gmail will get not only a message saying “remove this message from Label” but also “add this message to [GMAIL]/Trash”. This will cause the message to be hidden from ALL labels, and when we empty the trash it will disappear for good. So we can’t do that, despite Google’s suggestion. Instead we move it, which sends two messages to the server: “remove this message from Label” (thus accomplishing our goal) and “add this message to the [GMAIL]/All Mail folder” (where it probably already is anyway). The same trick can be used to undelete a message as well.

When to move, when to copy

When copying message within Mail.app, Gmail is smart about maintaining only a single underlying identity. This is important, because to add a label you can’t really “Move” a message from one folder to another, because that would also remove the label you moved it from. So, generally, to add a label to a message copy it instead of moving by holding down the command key while you drag. If you do want to remove the Inbox label (for example), then by all means do move instead of copy.

Regarding “Inbox” and “All Mail”

Both “Inbox” and “All Mail” are just tags. If you remove an item from either, it stays on Google’s server (unless you move a “copy” from any folder into “[GMAIL]/Trash” or “[GMAIL]/Spam”, which we’ve set up Mail to do). There seems to be a discrepancy between “All Mail” IMAP folder and the “All Mail” view online: if you delete messages from the folder in Mail.app it still shows up in the web interface.

In thinking about wrapping up…

If you’ve got any other questions, tips or corrections feel free to leave them in the comments. Or in the comments on my new arch-nemesis’s article. But keep in mind, when I find out which friend in Omsk told friend in Tomsk the results of my research, there will be great suffering in Guilder. (Kidding, kidding!)

November 14, 2007

Restore IMAP data from Mail’s offline imapmbox backup

written by natevw @ 9:48 am

Let’s say you come into work and find a note on your desk from your boss: “The mail server went belly up.” All the messages on the IMAP server are gone. What to do?

The first step, and this is very important: Do not open Mail.app until you’ve made a copy of the offline mailbox cache. (You can hold Shift while logging in to keep it from automatically opening.) If you let Mail sync to your now-empty IMAP account, it will erase your offline copies lickety-split. As long as this doesn’t happen, it’s pretty easy to restore the server from your local backup.

  1. Find the corresponding IMAP-user@host folder inside of ~/Library/Mail/. Make a copy somewhere safe, like your Desktop.
  2. Rename all the .imapmbox folders inside of your new copy to have the .mbox extension instead.
  3. Now you can open Mail, and import the main backup folder. Select “File > Import Mailboxes…”, choose the “Mail for OS X” option and then select the modified IMAP-user@host folder.
  4. Move folders back onto the IMAP server. You might need to make one new folder (”Add Mailbox”) on the IMAP server so that it shows in the sidebar, and then you can drag the rest from the Import folder. Any sent messages or todos can be moved to those special mailboxes as well.
  5. If Mail complains that the folders you are trying to drag in already exist, one workaround I found is to delete the IMAP account and set it up again. A simple “synchronize” might have also done the trick.

Once Mail is done uploading the messages, you can delete your “Import” copies of each Mailbox. Then you can get back to seizing the day, whilst hoping you don’t have to do any of this again.

November 5, 2007

Make a link to a Mail.app email message

written by natevw @ 2:53 pm

As reported by Gus Mueller, remembered by Fraser Speirs and reverse engineered by dragging messages from Mail.app into a rich TextEdit document: Mail.app now supports permalink URLs to messages.

The URLs are just “message:” followed by the Message-Id, which should be URL encoded. So if your Message-Id is “<abc%20071105@sender.org>” — the angle brackets are considered part of the Message-Id — the URL becomes “message:%3Cabc%2520071105@sender.org%3E”, although “message:<abc%2520071105@sender.org>” will also work from Safari’s address bar.

This is basically just the mid: URL scheme with a different scheme name. Why they used “message” instead of “mid” is strange, especially since on the Flying Meat forum there’s a discussion of links provided by an add-on called MailTags that use a similar URL scheme. These have an extra “//” before the Message-Id, and make Mail grumble that “No associated application could be found”. Update: On second try the extra “//”s seem to work as well, so the real question is why MailTags, not Apple, didn’t use the “mid:” form.

To get the Message-Id, select “Long headers” or “Raw Source” in Mail’s “View > Message” menu. You can also drag a message from Mail into a rich text field to get the hyperlink. Enjoy!

Update: John Gruber has put together a more definitive article on this topic, though he doesn’t make mention of the (seemingly historical) “mid:” URL scheme.

Find the IP address for an SMB share

written by natevw @ 1:30 pm

If you’re able to connect to a folder on a Windows SMB share via smb://beigeboxname, you can find its IP address via nmblookup beigeboxname. Handy as Remote Desktop Connection doesn’t seem to be able to lookup the machine by that same name.

August 20, 2007

Importing scanned images into iPhoto automatically

written by natevw @ 7:32 am

Over at Apple Matters, Chris Howard reviews iPhoto ‘08 laments that there is still no direct scanner import into iPhoto: “You still have to scan to a folder and then import that folder.”

You can eliminate half that battle using Automator. When you first load Automator, it will already have a blank “Get Specified Finder Items” step in place. Leave this as is, and drag “Import Photos into iPhoto” action below it. Have it add to a new album called “Scanned”, and check the “Delete Source Images After Importing Them” box. (I’ve uploaded a
screenshot of how this should look.)

Now we’re ready to “Save As Plug-in…” (from the File menu). Call it “Move to iPhoto” and choose “Folder Actions” in the “Plug-in for” drop down box. Pick the folder where your scans will be (you may need to select “Other…” and then click Save:
Automator save dialog

Now whenever an image is added to this folder, it will get moved into your iPhoto library automatically.

Next Page »